If you used small business accounting products in the early days, you know how frustrating it was to print checks correctly from your software. Pre-printed checks weren’t cheap, and you probably printed at least a few that didn’t line up right or were otherwise unusable.
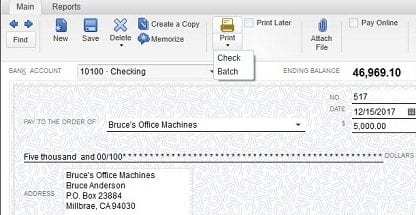
Figure 1: The Write Checks window in QuickBooks 2013.
Printing checks from QuickBooks has gotten easier, and online banking has made this task less of a necessity for many businesses. But when you do print checks, precision is still required.
So to minimize frustration, save time and money, and ensure that everything will be copacetic when your checks are processed at the bank, it’s important that you use the tools that QuickBooks offers appropriately. If you’ve been having trouble with check-printing or you’re considering attempting it, keep these tips in mind:
1. First, be sure you are creating standard checks, not paychecks. Go to Banking | Write Checks or click the Write Checks icon on the home page.
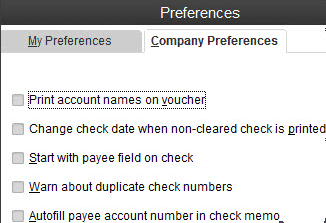
2. QuickBooks offers a few options for check creation. Click Edit | Preferences | Checking | My Preferences. Here, you can specify a default account for the Write Checks function. Click Company Preferences for additional options.
Figure 2: Check the boxes here to activate options.
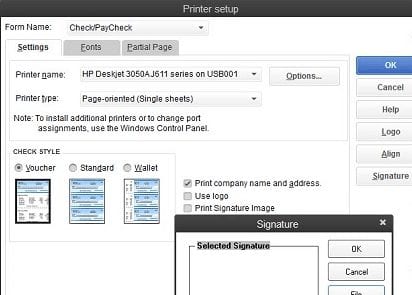
3. You can customize the appearance of your checks. Click File | Printer Setup | Check/PayCheck. Specify printer options and check style, change the fonts in some fields, designate a partial page printing style (using the envelope feed) and add your company’s name and address, logo and a signature image.
Figure 3: The Printer Setup window provides access to your output options.
4. Be sure that your printer has enough ink or toner before you begin a job.
5. If you print a lot of checks, consider dedicating one printer to that task. But secure your blank checks. Don’t leave them in the printer.
6. Does your printer process pages in reverse order, last page first? This can cause problems when you’re printing multiple checks. You have several options here. You can:
- Modify your printer’s property settings in Windows and/or consult your printer documentation
- Load the paper to accommodate reverse printing or
- Alter the check numbers in QuickBooks. Go to Lists | Chart of Accounts and open the correct checkbook register to change them. (This option is the least elegant and most risky, and not something you want to do on a regular basis. Let us help you with your printer setup if you can’t resolve the problem.)
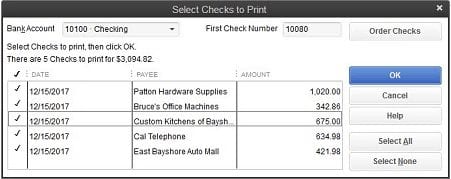
7. QuickBooks supports batch printing. If you’re writing multiple checks that you’ll want to print later, click the Print Later or To be printed link (depending on your version of QuickBooks). When you’re ready, you can either select File | Print Forms | Checks or click the Print Checks link on the home page. Both will open this window:
Figure 4: Uncheck any items you don’t want printed to remove them from the batch job.
8. Printing a batch of checks and realize that you’ve set something up wrong? Hit the Esc key to halt it.
9. Double-check to make sure that your numbers match before you launch a print job. Compare the number in the First Check Number field to the number of the first check queued up in the printer.
10. Ruin a check or an entire page of them? If your accounting protocol allows you to skip check numbers, just start over by changing the First Check Number so that it corresponds with the starting number on a fresh batch of check blanks. If not, you’ll have to create a check for each one that was ruined, choosing a name and account and an amount of $0.00. Then void the check(s). (Click Banking | Use Register and select the account. Highlight the transaction(s), select the edit option and void. Do not delete them.
Check-printing can be tricky, but it must absolutely follow the rules. If you get stuck or want some guidance upfront, contact one of Henssler Financial’s QuickBooks ProAdvisors®: experts@henssler.com or 770-429-9166.


