

Part of the reason for QuickBooks’ success is its exceptional flexibility. By allowing users to turn features and preferences on and off, the same software can be used by a wide variety of business types and sizes.
In some cases, the default settings that QuickBooks supplies will work fine for your company. This is not necessarily true in the case of purchase orders, since the whole inventory procurement process is so complex, and users can have such a diverse range of needs.
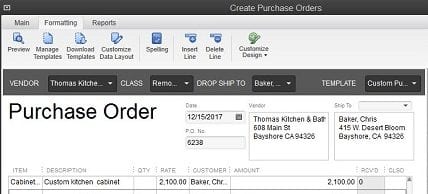
Figure 1: QuickBooks 2013’s default Create Purchase Orders screen. You can see that formatting options are available when you click the Formatting tab.
So before you order your first widget, make sure that your purchase order form is designed to accommodate all of the information you want to record and track, with no unnecessary data fields to confuse staff.
Working With Templates
There aren’t many program preferences to check. If you can open a purchase order, you’re set. If not, go to Edit | Preferences | Items & Inventory and be sure that the box next to Inventory and purchase orders are active is checked.
What you want to find first is the Additional Customization screen for the Custom Purchase Order Template. This is easily accessed from the Create Purchase Order screen itself in QuickBooks 2013, but if you’re using an earlier edition, go to Lists | Templates | Custom Purchase Order Template. Double-click on it to open the Basic Customization page. Here, you can add a logo, change fonts and colors, etc. But go ahead and click on the Additional Customization button at the bottom of the screen. This window opens:
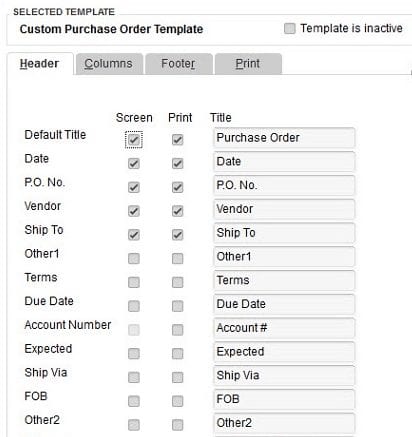
Figure 2: The left pane of the Additional Customization window contains additional fields that you might want on your purchase orders, like Ship Via and Terms.
Tip: If you want to design multiple purchase order templates, click Manage Templates on the Basic Customization screen, then Copy on the Manage Templates page. Rename the form and make your modifications. This version will always be available as an option when you create purchase orders.
Making It Yours
Each of this window’s four tabs opens a new screen that gives you customization control over a different element of the purchase order form: the top, bottom and midsection, and printing options. You simply check the boxes next to the fields that you want to add to the current form (be sure to check both columns if you want the fields to appear both onscreen and in your printed versions; sometimes, one is not an option) and uncheck any you want to delete.
In the right pane of this window, a dynamic preview changes to reflect each addition or deletion. And when you’ve finished altering the set of fields, you can see an actual print preview. Close that and keep clicking OK until you get back to the Templates window.
This simplicity and ease carries over into the more cosmetic elements of your purchase order. Make sure the template you want to redesign is highlighted and click Templates | Create Form Design. QuickBooks walks you through the process of adding a logo and background, colors and fonts, and a grid style, and it lets you apply this same theme automatically to all of your forms. (You can modify your design similarly on the Basic Customization page, minus the wizard-like approach and the background options.)
Simple But Complicated
One more comment about the QuickBooks 2013 purchase order screen. Beyond making your formatting options available in the “ribbon,” it also moves you through purchasing to the receiving process. With the appropriate purchase order open, click Create Item Receipts in the ribbon. This window opens, with the correct vendor name selected. When you click in the Item field, this small window appears:
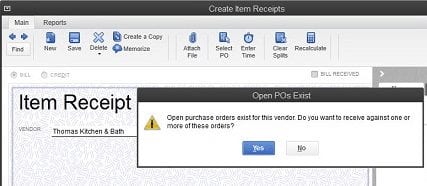
Figure 3: Click Yes here and select the correct PO, and QuickBooks fills in the data. If you check the Bill Received box, the Enter Bills window opens.
QuickBooks’ purchasing and receiving tools makes your inventory-tracking job easier, but you still need to understand the workflow. We encourage you to let us work with you as you begin managing inventory—or to contact us if you’re tangled up in what can be a very challenging element of QuickBooks.
If you have questions, contact Henssler Financial’s QuickBooks ProAdvisors®: experts@henssler.com or 770-429-9166.
Disclosures
This article is meant to provide valuable background information on particular investments, NOT a recommendation to buy. The investments referenced within this article may currently be traded by Henssler Financial. All material presented is compiled from sources believed to be reliable and current, but accuracy cannot be guaranteed. The contents are intended for general information purposes only. Information provided should not be the sole basis in making any decisions and is not intended to replace the advice of a qualified professional, such as a tax consultant, insurance adviser or attorney. Although this material is designed to provide accurate and authoritative information with respect to the subject matter, it may not apply in all situations. Readers are urged to consult with their adviser concerning specific situations and questions. This is not to be construed as an offer to buy or sell any financial instruments. It is not our intention to state, indicate or imply in any manner that current or past results are indicative of future profitability or expectations. As with all investments, there are associated inherent risks. Please obtain and review all financial material carefully before investing. Henssler is not licensed to offer or sell insurance products, and this overview is not to be construed as an offer to purchase any insurance products.